Lammas Recipes
Foods for Lammas, or Lughnassadh, include whatever is ripe in late summer. This is the end of the summer fruits and vegetables, and the beginning of autumn ones. Dessert apples are ready, but not the cooking/storage varieties. So are the early grains. It's a good time for tomato sauces and barbecues. Bread and beer are important themes for this sabbat as well. Golden and brown colors prevail. For background information and ritual ideas, see our main Lammas page.
Beefsteak Tomato Sauce
Ingredients:
3 ribs celery
1 sweet onion
1/2 bell pepper
1/4 cup olive oil
5 lbs. beefsteak tomatoes
2 large leaves sage (about 1 teaspoon)
6-8 sprigs thyme (about 1 teaspoon)
2 long sprigs oregano (about 2 teaspoons)
1 handful basil leaves (about 1/4 cup)
2-4 cloves garlic (about 2 teaspoons minced)
1 bay leaf
1 teaspoon coarse Himalayan pink salt
1/4 teaspoon freshly ground black pepper
24 oz. tomato paste
1 tablespoon brown sugar
1/4 cup molasses
Directions:
Fill two large pots with water. Set one of them to boil.
Wash 3 ribs of celery, cut off the ends, then slice into thin crescents. (If the bottom parts are really wide, cut stalk into thirds and split the lower thirds vertically before slicing.) Peel and dice the onion. Remove seeds and ribs from half a bell pepper and dice the pepper. Combine vegetables in a medium bowl.
Pour 1/4 cup olive oil into a large crock pot. Add mixed vegetables. Turn crock pot on Low and cover it.
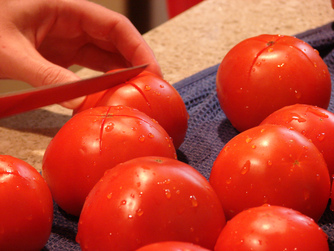
Wash the tomatoes. Core them and score the sides. When water reaches a rolling boil, add tomatoes 2-3 at a time. Wait 30-60 seconds until skins begin to wrinkle and peel. Transfer tomatoes to cold water. Remove and discard skins. Dice the peeled tomatoes. Add them to crock pot and stir.
Gather 2 large leaves sage, 6-8 sprigs thyme, and 1 handful basil leaves. With kitchen scissors, cut the sage leaves in half, removing large ribs. Stack the slices and snip into small bits over the crock pot. Wad the thyme into a cylinder and snip it into the crock pot. Strip the oregano leaves off the stems; discard stems. Wad the oregano leaves into a cylinder and snip them into the crock pot. Tear the basil leaves in half or quarters, removing large ribs. Roll them into a cylinder and snip into the crock pot. Then stir.
Peel and mince 2-4 cloves of garlic and add to crock pot. Add 1 bay leaf, 1 teaspoon coarse Himalayan pink salt, and 1/4 teaspoon freshly ground black pepper. Stir again.
Cook on Low for 2 hours. Stir, then taste. Add 24 oz. tomato paste. Stir carefully until fully blended. Cook another hour or so. Stir, then taste. The spaghetti sauce will probably be sour. Stir in 1 tablespoon brown sugar and
1/4 cup molasses. Ignore for another hour or so.
At this point, the sauce is built, though only partway cooked. To fine-tune the flavor, taste and pay careful attention to what is changing as the sauce cooks. If it tastes flat, try adding a little more salt and black pepper. If it’s still sour, add a bit of brown sugar. Add one or two things at a time if needed, then wait half an hour to an hour for them to blend in properly. Continue stirring and tasting occasionally.
The sauce is done when: 1) all the vegetables are translucent and tender; 2) the body of the sauce is thick, opaque, and deep red; and 3) you feel satisfied with the flavor. This takes about 8-10 hours total, depending on the crock pot.
Stir the sauce. Find and remove the bay leaf. If you are serving the sauce fresh, it can be poured over pasta or placed on the table for people to use as they wish. If you are storing it, pour the sauce into containers to refrigerate or freeze. This recipe makes about 9-10 cups of sauce. I usually pour a 2 1/2 cup carton of sauce over spaghetti to feed 3-4 people, so figure this at 11-14 servings.
Notes:
I like to use full-flavor olive oil – an import if I have some – for cooking when it’s an ingredient added for flavor. If you don’t like olive oil that much, you can use a bland variety.
Beefsteak or “slicing” tomatoes are round and firm, with thick juicy flesh. They are not really intended for making sauce, but they are terrific for flavor and for chunks. Pretty much any beefsteak cultivar will do. Depending on size, 5 lbs. will be about 8-10 beefsteak tomatoes. I had 9.
When dicing tomatoes for spaghetti sauce, make the pieces slightly larger than you want. They’ll cook down some. This recipe makes a thick, chunky sauce.
If you don’t have fresh herbs, you can substitute dried herbs. Cut the amounts about in half and then taste.
Use plain tomato paste if you can find it, because if there are spices that will affect the flavor. I used two 12 oz. cans of IGA Tomato Paste (“Ingredients: tomatoes.”) in mine.
Himalayan pink salt is a gourmet salt with a mild mineral flavor, not as strong as Hawaiian red salt. This goes well with tomatoes. If you don’t have any, use sea salt or table salt. If using fine salt, use about half as much, then taste.
It helps to know how your taste buds work. My mouth thinks better when I taste the spaghetti sauce by itself. Doug’s mouth thinks better when he puts the sauce on a cracker (to provide a starch substitute for spaghetti).
This sauce is more susceptible to overcooking than some other spaghetti sauces I have made, possibly due to the large amount of tomato paste. Take care during the last few hours as it thickens.
Ingredients cost three dollars and change for the tomatoes (imperfect ones on sale), a dollar and change for the tomato paste (found at a salvage store), and maybe another dollar for everything else; so about six or seven dollars total, breaking down to about fifty cents per serving. All the leafy herbs that grow in this climate – the sage, thyme, oregano, and basil – came from my garden.
This recipe was originally published in The Wordsmith's Forge on 7/30/09, and revised for reprint 6/22/11.
3 ribs celery
1 sweet onion
1/2 bell pepper
1/4 cup olive oil
5 lbs. beefsteak tomatoes
2 large leaves sage (about 1 teaspoon)
6-8 sprigs thyme (about 1 teaspoon)
2 long sprigs oregano (about 2 teaspoons)
1 handful basil leaves (about 1/4 cup)
2-4 cloves garlic (about 2 teaspoons minced)
1 bay leaf
1 teaspoon coarse Himalayan pink salt
1/4 teaspoon freshly ground black pepper
24 oz. tomato paste
1 tablespoon brown sugar
1/4 cup molasses
Directions:
Fill two large pots with water. Set one of them to boil.
Wash 3 ribs of celery, cut off the ends, then slice into thin crescents. (If the bottom parts are really wide, cut stalk into thirds and split the lower thirds vertically before slicing.) Peel and dice the onion. Remove seeds and ribs from half a bell pepper and dice the pepper. Combine vegetables in a medium bowl.
Pour 1/4 cup olive oil into a large crock pot. Add mixed vegetables. Turn crock pot on Low and cover it.
Wash the tomatoes. Core them and score the sides. When water reaches a rolling boil, add tomatoes 2-3 at a time. Wait 30-60 seconds until skins begin to wrinkle and peel. Transfer tomatoes to cold water. Remove and discard skins. Dice the peeled tomatoes. Add them to crock pot and stir.
Gather 2 large leaves sage, 6-8 sprigs thyme, and 1 handful basil leaves. With kitchen scissors, cut the sage leaves in half, removing large ribs. Stack the slices and snip into small bits over the crock pot. Wad the thyme into a cylinder and snip it into the crock pot. Strip the oregano leaves off the stems; discard stems. Wad the oregano leaves into a cylinder and snip them into the crock pot. Tear the basil leaves in half or quarters, removing large ribs. Roll them into a cylinder and snip into the crock pot. Then stir.
Peel and mince 2-4 cloves of garlic and add to crock pot. Add 1 bay leaf, 1 teaspoon coarse Himalayan pink salt, and 1/4 teaspoon freshly ground black pepper. Stir again.
Cook on Low for 2 hours. Stir, then taste. Add 24 oz. tomato paste. Stir carefully until fully blended. Cook another hour or so. Stir, then taste. The spaghetti sauce will probably be sour. Stir in 1 tablespoon brown sugar and
1/4 cup molasses. Ignore for another hour or so.
At this point, the sauce is built, though only partway cooked. To fine-tune the flavor, taste and pay careful attention to what is changing as the sauce cooks. If it tastes flat, try adding a little more salt and black pepper. If it’s still sour, add a bit of brown sugar. Add one or two things at a time if needed, then wait half an hour to an hour for them to blend in properly. Continue stirring and tasting occasionally.
The sauce is done when: 1) all the vegetables are translucent and tender; 2) the body of the sauce is thick, opaque, and deep red; and 3) you feel satisfied with the flavor. This takes about 8-10 hours total, depending on the crock pot.
Stir the sauce. Find and remove the bay leaf. If you are serving the sauce fresh, it can be poured over pasta or placed on the table for people to use as they wish. If you are storing it, pour the sauce into containers to refrigerate or freeze. This recipe makes about 9-10 cups of sauce. I usually pour a 2 1/2 cup carton of sauce over spaghetti to feed 3-4 people, so figure this at 11-14 servings.
Notes:
I like to use full-flavor olive oil – an import if I have some – for cooking when it’s an ingredient added for flavor. If you don’t like olive oil that much, you can use a bland variety.
Beefsteak or “slicing” tomatoes are round and firm, with thick juicy flesh. They are not really intended for making sauce, but they are terrific for flavor and for chunks. Pretty much any beefsteak cultivar will do. Depending on size, 5 lbs. will be about 8-10 beefsteak tomatoes. I had 9.
When dicing tomatoes for spaghetti sauce, make the pieces slightly larger than you want. They’ll cook down some. This recipe makes a thick, chunky sauce.
If you don’t have fresh herbs, you can substitute dried herbs. Cut the amounts about in half and then taste.
Use plain tomato paste if you can find it, because if there are spices that will affect the flavor. I used two 12 oz. cans of IGA Tomato Paste (“Ingredients: tomatoes.”) in mine.
Himalayan pink salt is a gourmet salt with a mild mineral flavor, not as strong as Hawaiian red salt. This goes well with tomatoes. If you don’t have any, use sea salt or table salt. If using fine salt, use about half as much, then taste.
It helps to know how your taste buds work. My mouth thinks better when I taste the spaghetti sauce by itself. Doug’s mouth thinks better when he puts the sauce on a cracker (to provide a starch substitute for spaghetti).
This sauce is more susceptible to overcooking than some other spaghetti sauces I have made, possibly due to the large amount of tomato paste. Take care during the last few hours as it thickens.
Ingredients cost three dollars and change for the tomatoes (imperfect ones on sale), a dollar and change for the tomato paste (found at a salvage store), and maybe another dollar for everything else; so about six or seven dollars total, breaking down to about fifty cents per serving. All the leafy herbs that grow in this climate – the sage, thyme, oregano, and basil – came from my garden.
This recipe was originally published in The Wordsmith's Forge on 7/30/09, and revised for reprint 6/22/11.
Beebleberry Ice Cream
Ingredients:
1 pint mixed berries
3 tablespoons lemon juice
1/3 cup and 2/3 cups sugar, divided
1 cup whole milk
2 cups heavy cream
1 teaspoon Saigon cinnamon
1 teaspoon vanilla extract
Directions:
In small bowl, combine mixed berries, lemon juice, and 1/3 cup sugar. Stir gently. Allow berries to macerate for 2 hours, stirring occasionally.
In a medium bowl, whisk the milk and 2/3 cup sugar until sugar dissolves. Stir in the heavy cream, cinnamon, and vanilla extract. Add any accumulated juices from the berries, and stir.
Turn ice cream machine ON. Pour mixture into freezer bowl through ingredient spout, and mix for 25 minutes.
Add the mixed berries through the ingredient spout, and mix for another 5 minutes.
Transfer soft-frozen ice cream to a lidded container and freeze until set firm, about 1-2 hours. Makes about 1 quart.
Notes:
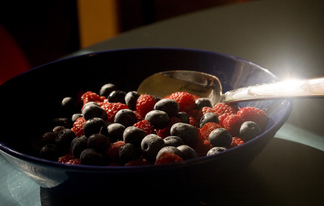
The recipe was inspired by pie filling. I usually use a combination of black raspberries, blackberries, and strawberries; but any berries will work.
"Beebleberry" is a family nickname for any mixed-berry blend, inspired by a reference in the "Little Lulu" comic books.
The Saigon cinnamon is what gives this ice cream a little bite – if you can't find this kind, use ordinary cinnamon and add a couple drops of cinnamon extract or candy flavoring.
This recipe was originally published in Whispering Grey Matters, December 2005. It was revised for reprint 6/22/11.
1 pint mixed berries
3 tablespoons lemon juice
1/3 cup and 2/3 cups sugar, divided
1 cup whole milk
2 cups heavy cream
1 teaspoon Saigon cinnamon
1 teaspoon vanilla extract
Directions:
In small bowl, combine mixed berries, lemon juice, and 1/3 cup sugar. Stir gently. Allow berries to macerate for 2 hours, stirring occasionally.
In a medium bowl, whisk the milk and 2/3 cup sugar until sugar dissolves. Stir in the heavy cream, cinnamon, and vanilla extract. Add any accumulated juices from the berries, and stir.
Turn ice cream machine ON. Pour mixture into freezer bowl through ingredient spout, and mix for 25 minutes.
Add the mixed berries through the ingredient spout, and mix for another 5 minutes.
Transfer soft-frozen ice cream to a lidded container and freeze until set firm, about 1-2 hours. Makes about 1 quart.
Notes:
The recipe was inspired by pie filling. I usually use a combination of black raspberries, blackberries, and strawberries; but any berries will work.
"Beebleberry" is a family nickname for any mixed-berry blend, inspired by a reference in the "Little Lulu" comic books.
The Saigon cinnamon is what gives this ice cream a little bite – if you can't find this kind, use ordinary cinnamon and add a couple drops of cinnamon extract or candy flavoring.
This recipe was originally published in Whispering Grey Matters, December 2005. It was revised for reprint 6/22/11.
Blackberry Pork Ribs
Ingredients:
1 red onion
3 lb. pork ribs
salt
pepper
allspice
cinnamon
about 1 1/2 cups blackberries
3/4 cup barbecue sauce
1/4 cup organic ketchup
Directions:
Thinly slice the red onion. Arrange slices to cover the bottom of the crock pot.
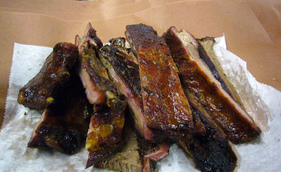
Rinse and pat dry the pork ribs. (If you have one big slab, cut it into smaller sections now.) Lightly dust the pork ribs with salt, pepper, allspice, and cinnamon on all sides. Put the pork ribs into the crock pot. Pour 1 1/2 cups blackberries over the pork ribs.
Cover the crock pot. Turn on Low and cook for 4-6 hours until ribs are tender.
For drier ribs, remove excess liquid at this stage. For wetter ribs you can just leave it. Now combine 3/4 cup barbecue sauce and 1/4 cup organic ketchup, and pour that over the pork ribs.
Cover the crock pot and cook on Low for another 30 minutes. Serves 3-5.
Notes:
Red onion has a sweet yet darkish flavor that interacts very well with dark fruits and meats. Substitute white or yellow onion if you can't find red.
Blackberries may be fresh or frozen. I used frozen ones. Just make sure they don't have sugar or other additives: use plain berries. Blackberries have a nice complex flavor that complements some meats.
Organic ketchup is healthier, and a good brand has better flavor, than ordinary commercial ketchup. It works better in recipes where you combine it other stuff. Adding ketchup to barbecue sauce makes for a fruitier flavored sauce.
This recipe was originally published in The Wordsmith's Forge on 7/21/10, then revised for reprint 6/22/11.
1 red onion
3 lb. pork ribs
salt
pepper
allspice
cinnamon
about 1 1/2 cups blackberries
3/4 cup barbecue sauce
1/4 cup organic ketchup
Directions:
Thinly slice the red onion. Arrange slices to cover the bottom of the crock pot.
Rinse and pat dry the pork ribs. (If you have one big slab, cut it into smaller sections now.) Lightly dust the pork ribs with salt, pepper, allspice, and cinnamon on all sides. Put the pork ribs into the crock pot. Pour 1 1/2 cups blackberries over the pork ribs.
Cover the crock pot. Turn on Low and cook for 4-6 hours until ribs are tender.
For drier ribs, remove excess liquid at this stage. For wetter ribs you can just leave it. Now combine 3/4 cup barbecue sauce and 1/4 cup organic ketchup, and pour that over the pork ribs.
Cover the crock pot and cook on Low for another 30 minutes. Serves 3-5.
Notes:
Red onion has a sweet yet darkish flavor that interacts very well with dark fruits and meats. Substitute white or yellow onion if you can't find red.
Blackberries may be fresh or frozen. I used frozen ones. Just make sure they don't have sugar or other additives: use plain berries. Blackberries have a nice complex flavor that complements some meats.
Organic ketchup is healthier, and a good brand has better flavor, than ordinary commercial ketchup. It works better in recipes where you combine it other stuff. Adding ketchup to barbecue sauce makes for a fruitier flavored sauce.
This recipe was originally published in The Wordsmith's Forge on 7/21/10, then revised for reprint 6/22/11.
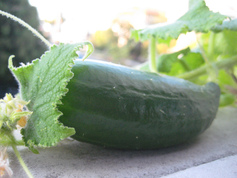
Cucumber-Mint Sorbet
Ingredients:
4 large cucumbers
3 tablespoons fresh mint leaves
1/4 cup organic sugar
1/4 teaspoon salt
1 teaspoon lime juice
Directions:
Peel the cucumber and slice them in half lengthwise. Remove the seeds. Chop the cucumbers and put them in a blender. Add the remaining ingredients and liquefy until smooth.
Pour cucumber mixture into the ice cream machine; freeze for about 15 minutes, or until stiff. Serve immediately or transfer to a container and store in the freezer.
Notes:
You may want to run the liquified cucumber mixture through a coarse sieve to remove any remaining seeds or chunks.
This stuff sets fast and relatively firm. You could serve it right out of the ice cream machine. When finished, it is an appetizing light green without need of food coloring.
While not intended as a dessert sorbet, this stuff is surprisingly good! It is cool, refreshing, and mildly sweet. It would make a perfect palate cleanser between courses at a summer brunch, picnic, or supper. Excellent contrast against anything hot or spicy such as curry, chili, or barbecue.
This recipe was originally published in The Wordsmith's Forge on 7/21/08, and revised for reprint 6/22/11.
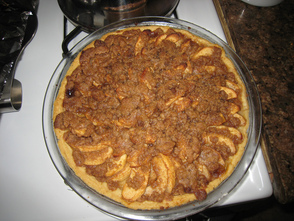
Ginger Gold Apple Pie
Ingredients:
1 frozen pie crust, thawed
4 Ginger Gold apples
1 tablespoon lemon juice
1 tablespoon fresh grated ginger root
1/2 teaspoon powdered ginger
1/3 cup white sugar
1/2 cup flour
1/2 cup quick rolled oats
1/3 cup firmly packed light brown sugar
1/4 teaspoon powdered ginger
1/4 teaspoon allspice
2 tablespoons crystallized ginger chips
5 tablespoons butter
Directions:
Preheat the oven to 350ºF.
Peel the ginger root. Grate it (or mince it in a food processor) and measure 1 tablespoon. Extra ginger can be frozen for later use.
Slice the apples and remove the cores. Put the apple slices in a large glass bowl. Pour 1 tablespoon of lemon juice over the apple slices and toss to coat evenly. Add 1 tablespoon fresh grated ginger root. Sprinkle 1/2 teaspoon powdered ginger and 1/3 cup white sugar over the apple slices. Toss to coat evenly.
In a medium-size bowl, combine 1/2 cup flour, 1/2 cup quick rolled oats, and 1/3 cup firmly packed light brown sugar. Mix thoroughly. Add 1/4 teaspoon powdered ginger, 1/4 teaspoon allspice, and 2 tablespoons crystallized ginger chips. Mix thoroughly. Slice 5 tablespoons of butter into pats and add them to the bowl. Use a butter cutter to combine dry ingredients with butter, until loose and crumbly.
Put the apple slices into the pie crust. Scrape the bowl to get all the sugar and spices onto the apples. Gently arrange the apple slices so they lie flat. Spoon the crumble topping over the apples, covering them completely.
Bake the pie at 350ºF for 20 minutes. Then take it out and check for doneness. Poke a fork into the center; the pie is done when the apples are tender but not mushy. Also check the edges of the crust; they should be golden brown. If it’s not done yet, return to the oven for another 5-10 minutes and check it again. Adding a pie shield during the later stage will help prevent burned crust.
Notes:
Yes, I cheated a bit and used a premade frozen pie crust. This would probably be better with a homemade crust. I was just too busy for that today.
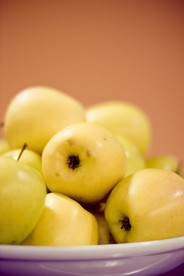
Ginger Gold is an early-season dessert apple that ripens in late August to early September. These apples have yellow skin and crisp white flesh. They really do taste of ginger – a bright, high note of spice soaring above the overall apple flavor. Because they are dessert apples rather than real cooking apples, be careful not to overcook them or the flavor and texture will melt away.
Could you use some other type of apple in this recipe? Sure, but it wouldn’t have quite the same spritely taste. This is truly a seasonal treat, because Ginger Gold isn’t a “keeper” variety; it’s only available a few weeks out of the year. Savor it accordingly.
The filling and crumble topping are designed to have a nice flavor contrast. Notice the use of white sugar, lemon juice, and fresh ginger in the filling vs. brown sugar, crystallized ginger, and allspice in the topping. The powdered ginger helps unify the flavors.
If you can’t find crystallized ginger chips – Ginger People is an excellent brand – then you can substitute regular crystallized ginger chunks minced finely.
I wound up cooking my pie 20 minutes, then 10 minutes with a foil pie shield, then another 3 minutes with the shield off. Total time = 33 minutes.
The flavor turned out exactly as I hoped: bright and sweet and sprightly. The texture was almost perfect: apples tender but not mushy, and the pie held together well, but oozed juice into the bottom of the pan. Next time I’ll try adding a bit of unflavored gelatin or tapioca to thicken it just a smidge.
This recipe was originally published in The Wordsmith's Forge9/13/08, and revised for reprint 6/22/11.
1 frozen pie crust, thawed
4 Ginger Gold apples
1 tablespoon lemon juice
1 tablespoon fresh grated ginger root
1/2 teaspoon powdered ginger
1/3 cup white sugar
1/2 cup flour
1/2 cup quick rolled oats
1/3 cup firmly packed light brown sugar
1/4 teaspoon powdered ginger
1/4 teaspoon allspice
2 tablespoons crystallized ginger chips
5 tablespoons butter
Directions:
Preheat the oven to 350ºF.
Peel the ginger root. Grate it (or mince it in a food processor) and measure 1 tablespoon. Extra ginger can be frozen for later use.
Slice the apples and remove the cores. Put the apple slices in a large glass bowl. Pour 1 tablespoon of lemon juice over the apple slices and toss to coat evenly. Add 1 tablespoon fresh grated ginger root. Sprinkle 1/2 teaspoon powdered ginger and 1/3 cup white sugar over the apple slices. Toss to coat evenly.
In a medium-size bowl, combine 1/2 cup flour, 1/2 cup quick rolled oats, and 1/3 cup firmly packed light brown sugar. Mix thoroughly. Add 1/4 teaspoon powdered ginger, 1/4 teaspoon allspice, and 2 tablespoons crystallized ginger chips. Mix thoroughly. Slice 5 tablespoons of butter into pats and add them to the bowl. Use a butter cutter to combine dry ingredients with butter, until loose and crumbly.
Put the apple slices into the pie crust. Scrape the bowl to get all the sugar and spices onto the apples. Gently arrange the apple slices so they lie flat. Spoon the crumble topping over the apples, covering them completely.
Bake the pie at 350ºF for 20 minutes. Then take it out and check for doneness. Poke a fork into the center; the pie is done when the apples are tender but not mushy. Also check the edges of the crust; they should be golden brown. If it’s not done yet, return to the oven for another 5-10 minutes and check it again. Adding a pie shield during the later stage will help prevent burned crust.
Notes:
Yes, I cheated a bit and used a premade frozen pie crust. This would probably be better with a homemade crust. I was just too busy for that today.
Ginger Gold is an early-season dessert apple that ripens in late August to early September. These apples have yellow skin and crisp white flesh. They really do taste of ginger – a bright, high note of spice soaring above the overall apple flavor. Because they are dessert apples rather than real cooking apples, be careful not to overcook them or the flavor and texture will melt away.
Could you use some other type of apple in this recipe? Sure, but it wouldn’t have quite the same spritely taste. This is truly a seasonal treat, because Ginger Gold isn’t a “keeper” variety; it’s only available a few weeks out of the year. Savor it accordingly.
The filling and crumble topping are designed to have a nice flavor contrast. Notice the use of white sugar, lemon juice, and fresh ginger in the filling vs. brown sugar, crystallized ginger, and allspice in the topping. The powdered ginger helps unify the flavors.
If you can’t find crystallized ginger chips – Ginger People is an excellent brand – then you can substitute regular crystallized ginger chunks minced finely.
I wound up cooking my pie 20 minutes, then 10 minutes with a foil pie shield, then another 3 minutes with the shield off. Total time = 33 minutes.
The flavor turned out exactly as I hoped: bright and sweet and sprightly. The texture was almost perfect: apples tender but not mushy, and the pie held together well, but oozed juice into the bottom of the pan. Next time I’ll try adding a bit of unflavored gelatin or tapioca to thicken it just a smidge.
This recipe was originally published in The Wordsmith's Forge9/13/08, and revised for reprint 6/22/11.
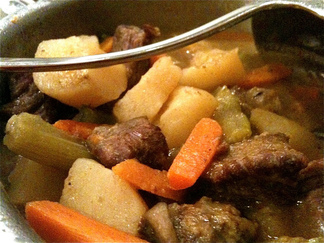
Lemon-Basil Beef Stew
Ingredients:
2 pounds boneless beef stew meat cubes
fresh-ground black-and-white peppercorns
sea salt
3 1/2 cups chicken stock
3 large potatoes
1 large onion
2 carrots
3 celery ribs
4 fresh sage leaves (about 1/2 tablespoon minced)
8 fresh thyme sprigs (about 1/2 teaspoon minced)
2 fresh oregano sprigs (about 1 teaspoon minced)
8 small fresh lemon basil leaves (about 1 tablespoon minced)
1 bay leaf
Directions:
Put 2 pounds of boneless beef stew meat cubes into a crock pot. Sprinkle with fresh-ground black-and-white peppercorns and sea salt to taste. Pour in 3 1/2 cups chicken stock. Cover and turn crock pot on Low.
Scrub and peel 3 large potatoes. Cut into bite-sized chunks and add them to the crock pot. Peel and coarsely chop 1 large onion; add it to the crock pot. Peel 2 carrots and cut them into thick coins, then add to the crock pot. Rinse the celery ribs, remove ends, and cut stalks into thirds. Split the lower third of each rib so it’s not too wide. Slice the celery into crescents and add to the crock pot. Stir the vegetables and meat together.
Take 4 fresh sage leaves and cut them in half lengthwise, removing the big ribs. Use kitchen scissors to snip them into tiny pieces over the crock pot. Fold up 8 fresh thyme sprigs and snip them into the crock pot. Strip the leaves off 2 fresh oregano sprigs and discard the stems. Roll the leaves into a wad and snip them into the crock pot. Roll up 8 small fresh lemon basil leaves and snip them into the crock pot. Add one bay leaf. Stir the herbs into the vegetables and meat.
Cook on Low for 4-5 hours until done. Meat should be thoroughly brown and separate easily; vegetables should be tender but not mushy.
Notes:
We bought a big package of boneless beef stew meat pre-cut into nice cubes, which we divided into several 1-lb. packages. Two of those went into this dish. Remember that cubed stew meat will cook faster than a solid roast, so keep an eye on this.
If you don’t have fancy peppercorns, plain black pepper will do, preferably fresh-ground pepper. Plain table salt instead of sea salt is also okay. If you can’t get chicken stock, broth should work, but the stew won’t be as thick.
Use whatever root vegetables you have, in the proportions you like. Baby potatoes would be great, I just happened to have these big ones. I went light on the carrots because one person here dislikes them.
Use fresh herbs if at all possible. If using dried herbs, start with 1/3 the amount and then taste the stew; you can add more if necessary.
The lemon basil is crucial to this recipe. It adds a wonderful high, bright, spicy note to the savory flavor of the stew. If you can’t get lemon basil, try substituting spicy basil or sweet basil plus a teaspoon or so of lemon juice.
Why lemon basil with beef stew, not a place one would ordinarily put a sweet herb? I was picking the sage, and the lemon basil just looked and smelled SO good, I had to throw some into the stew. I’m glad I did, because this is way better than previous beef crock pots I’ve made. This is the first year I’ve succeeded in growing basil, and I am really enjoying the extra dimension that fresh basil adds to my cooking.
This recipe was originally published in The Wordsmith's Forge on 8/20/09, and revised for reprint 6/22/11.
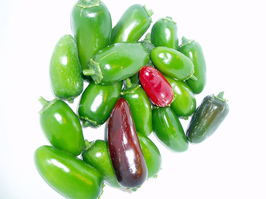
Stuffed Jalapeños with Cream Cheese and Bacon
Ingredients:
8-10 giant jalapeño peppers
6 slices thick-cut smoked bacon
8 oz. cream cheese
10-12 fresh chive leaves (about 1/4 cup chopped chives)
about 1/4 cup grated aged sharp white cheddar cheese
1/8 teaspoon garlic powder
1/8 teaspoon freshly ground black-and-white peppercorn mix
1/8 teaspoon smoked salt
Directions:
Set out the cream cheese to soften at room temperature. Preheat oven to 450ºF.
Wash and pat dry the jalapeño peppers. Push or twist the base of each stem with your thumb and it should pop off. If you have to cut the stems off, cut them carefully right at the base so as not to make a hole in the pepper. Lay each pepper on the cutting board and move it around until you find the way it lies flat, because you don’t want them flopping around after they’re stuffed. With the pepper on its stable flat side, carefully slit the upward-facing side from stem to tip, following the curve if the pepper is not straight. Use a spoon and your fingers to pry open the slit, being careful not to tear apart the pepper. Scrape out the core and as many of the seeds as you can get. Put the peppers in a bowl and set them aside.
Start cooking 6 slices of thick-cut smoked bacon. They will need to cook for several minutes, until crispy, and then be drained and cooled; meanwhile you can work on the cheese filling.
Cut down the chive leaves into sections about 4-6” long and bundle them together in your hand. Hold them over a medium mixing bowl and use kitchen scissors to snip them into tiny bits.
Grate some aged sharp white cheddar cheese over the chives until you have about 1/4 cup of cheese shreds.
Add 1/8 teaspoon garlic powder, 1/8 teaspoon freshly ground black-and-white peppercorn mix, and 1/8 teaspoon smoked salt to the mixing bowl. Cut the cream cheese into chunks and add it to the mixing bowl. Crumble the crisp bacon onto the cream cheese. Mix the filling thoroughly by hand kneading or with an electric mixer.
With one hand, open the slit in a pepper and use your other thumb to push in small amounts of filling, mashing it towards the stem end and gradually working down toward the tip until the pepper is all full. It’s okay if some filling sticks out the top, but don’t overfill the peppers or it will ooze out everywhere.
Spray a baking sheet with cooking spray. Arrange the stuffed jalapeño peppers on the sheet so they are not touching each other. Bake at 450ºF for 20-25 minutes, until peppers start to wrinkle and filling is brown on top.
Notes:
We had 6 enormous jalapeño peppers, about 4” long, not very hot ones. Get the biggest ones you can find. I had some stuffing left over, so I’m guessing that 8-10 this size would’ve been enough. If you’re using little jalapeños, you may need more of them; try 10-12. Also little ones would need to cook less, so put them in for 15 minutes, then check for doneness.
Don’t obsess over getting every last seed out of the peppers; there usually isn’t room for that. A few seeds won’t hurt anything. In fact, if you want to make the filling hotter, you can separate the seeds from the pith and add the seeds to the cream cheese.
Any kind of flavored bacon should work great in this recipe, like hickory smoked, apple smoked, black-pepper coated, etc. Plain bacon should also do fine. If you can’t find thick-cut bacon, add a couple extra strips.
I cooked my bacon in the microwave for about 7 minutes total. You can microwave or fry yours, as you prefer. Just aim to make it crispy when done. Putting it in the refrigerator for a few minutes will cool it down faster.
Chives are like just the green part of green onions, only narrower. Mine are so strong this year, they made me cry when I chopped this many. So if you don’t have fresh chives, I recommend substituting one green onion; mince the whole thing and mix it into the filling. Use dried chives only as a last resort.
We had a brick of aged sharp white cheddar cheese. Any relatively hard and dry white cheese, with a good strong flavor, should work in this recipe. You need something that will grate nicely, not smear or crumble.
If you don’t have a fancy peppercorn blend, use plain black pepper, freshly ground if possible. If you don’t have smoked salt, use sea salt or plain table salt. But the “smoked” flavor in the bacon and the salt really add a lot of character.
If you have very sensitive skin, you may want kitchen gloves while handling the jalapeño peppers, and maybe use a wide-mouthed pastry pipe or a spoon to fill them. These were very mild peppers and they still made my skin sting.
This dish was a hit with my human guinea-pigs, who devoured the entire batch between the two of them. I tried a bite and found it not bad, even though I am not a pepper fan. The jalapeño peppers came out very tender, and the filling was terrific.
This filling should work equally well with other types of stuffed vegetables, such as tomatoes. We plan to try the leftover filling in portabella mushroom caps.
This recipe was originally published in The Wordsmith's Forge on 8/20/09, and revised for reprint 6/22/11.
Photos used under Creative Commons from racheocity, the uff da! chronicles, shoothead, Kent Wang, jwalsh, Minnaert, anokarina, jenniferworthen
