Yule Recipes
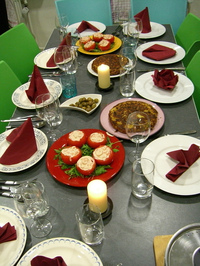
Winter solstice marks the longest night of the year. Yule foods therefore emphasize things that can be stored: root vegetables and squashes, cooking apples and pears, dried or frozen foods, canned and pickled vegetables, and various meats. Warm spices revive people after a cold day. The colors red and green, blue and white, silver and gold are popular. The Yule feast is often the most spectacular spread of the year. For background information and ritual ideas, see our main Yule page.
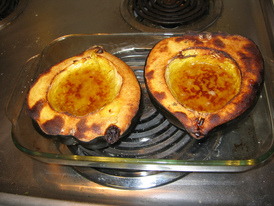
Baked Acorn Squash
Ingredients:
1 acorn squash
2 pinches fine sea salt
4 tablespoons brown sugar
about 1/4 teaspoon apple pie spice
2 tablespoons butter cut into 4 pats
1-2 tablespoons half-and-half (optional)
Directions:
Preheat oven to 400ºF.
Cut the acorn squash in half vertically, from the stem end to the flower end. With a spoon, scoop out the seeds. Scrape the inside of the squash to remove as much of the stringy mass as possible without cutting into the flesh. Place the halves cut side up in a baking dish.
Sprinkle a pinch of fine sea salt into each squash half, spreading it around. Put 2 tablespoons of brown sugar into the hollow of each half. Sprinkle generously with apple pie spice. Top with two pats of butter per squash half, which should cover most of the brown sugar.
Add about 1/2 inch of water to the baking dish so that the squash won't burn or dry out too much. Put the squash into the oven and bake for 50-60 minutes. When done, the flesh and rind should be soft; the flesh will be slightly translucent; and the edges of the rind should curl inward slightly.
Serving Option #1: If you wish to serve these as individual portions, allow them to cool slightly and then set the dish on the table. This works well for people who love squash and/or when this is intended as a significant part of the meal.
Serving Option #2: If you wish to serve this as a mass, you may cream the squash. Allow the squash to cool slightly. Carefully lift one half and pour any liquid filling into a medium serving bowl. Scrape the flesh out of the squash and into the bowl. Repeat with the second half of the squash. Mash the squash well with a potato masher, or use a mixer on low speed. Add 1-2 tablespoons of half-and-half, then mash again. Serve.
This serves 2-4 people, depending on how much you like squash.
Notes:
If you don't have fine sea salt, ordinary table salt will do.
I used apple pie spice because I didn't have pumpkin pie spice, which would've been my first choice. Good single spices for acorn squash include cinnamon, allspice, clove, ginger, and nutmeg. You can measure exactly if you prefer, but I find that sprinkling gives better distribution in this case.
If possible, use real butter and half-and-half for this recipe. You could try substituting margarine or milk, but the fat helps smooth and bind the squash.
This recipe would probably work with other winter squash, such as butternut. You may need to adjust the amounts used for the filling.
This recipe was originally published in The Wordsmith's Forge on 2/10/10, then revised for reprint 6/23/11.
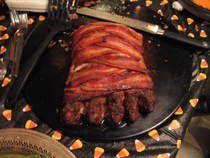
Deerloaf with Bacon
Ingredients:
2 lbs. ground venison
1 lb. bacon strips
2 eggs
1/2 cup milk
1 small sweet onion, diced
about 1 tube of saltine crackers
3 juniper berries
1/2 teaspoon black peppercorns
1/2 teaspoon sea salt
1/2 teaspoon sage
1/4 teaspoon rosemary
Directions:
Preheat oven to 350º. This recipe will make two loaves. Grease two loaf pans. Both the ground venison and the bacon should be thawed and room temperature. Count the bacon strips and divide into two batches.
In a mortar and pestle, crush the juniper berries and peppercorns. Add the sea salt and sage. Crumble the rosemary needles with your fingers and add them. Mix all the spices together evenly.
Put the ground venison in a large bowl. Add 2 eggs, 1/2 cup milk, and diced onion. Crush the crackers and add them to the bowl. Mix everything together. It should have a firm, even consistency and stick together well enough that you can pick up the ball and turn it over in the bowl. If it’s too wet, add more crackers; if it’s too dry, add a little more milk. When the consistency is right, add the spice blend and mix thoroughly.
Divide the meat mixture in half. Shape each half into a loaf. Each loaf gets 1/2 lb. of bacon for wrapping. Divide the first batch of bacon in half so that you have several strips to line the bottom of a loaf pan lengthwise; put the deerloaf into the pan on top of the bacon; and lay the remaining bacon strips lengthwise on top of the deerloaf. Repeat the process for the second loaf.
Bake at 350º for 1 to 1 1/2 hours. A single 1-lb. deerloaf usually cooks in about an hour; cooking two in the same oven can make it take longer. The juices should run clear when the deerloaf is done. Remove loaves from the oven and place on a cooling rack. Allow 5-10 minutes for cooling before cutting into the deerloaf.
Notes:
It’s easier to make this recipe with two people, one to measure ingredients and one to mix things into the ground meat by hand.
The spices in this recipe are fine-tuned for venison. The bacon adds fat so the lean venison doesn’t stick to the pan and burn. Similar game meat such as elk or moose might work as substitutes; domestic meat such as beef or lamb would do better with a different spice blend.
I knead my meatloaf ingredients by hand. You can try using a spoon or a mixer if you prefer, though you’d probably need dough hooks on the mixer.
You can cook both loaves at once, or wrap one to freeze for later. One loaf will feed 3-4 people, especially with side dishes.
Don’t try to cut through the bacon strips when slicing the deerloaf. Just peel them off and serve them whole.
This recipe was originally published in The Wordsmith's Forge on 8/22/08, then revised for reprint 6/23/11.
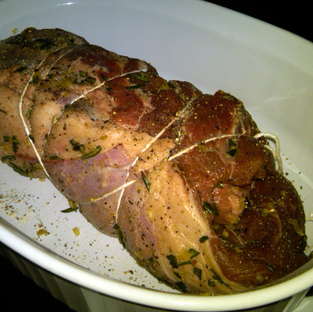
Egyptian Leg of Lamb
Ingredients:
3-5 lb. boneless leg of lamb
For marinade:
1/2 teaspoon black peppercorns
1/4 teaspoon coarse sea salt
1/4 teaspoon cumin seed
1/4 teaspoon ground coriander
pinch fennel seed
1/2 cup red wine vinegar
For coating:
1 teaspoon ground ginger
1 teaspoon ground black pepper
1/2 teaspoon ground coriander
1/2 teaspoon ground cardamom
1/4 teaspoon ground cumin
Directions:
In a mortar and pestle, combine 1/2 teaspoon black peppercorns, 1/4 teaspoon coarse sea salt, 1/4 teaspoon cumin seed, 1/4 teaspoon ground coriander, and a pinch of fennel seed. Grind coarsely. Pour the combined spices into a gallon ziplock bag.
Add 1/2 cup red wine vinegar to the bag. Shake to distribute spices.
Rinse the leg of lamb, then shake off excess water. Place the lamb inside the bag. Squeeze out as much air as possible, then seal. Turn and squeeze the bag to distribute the marinade and spices evenly around the meat.
Place the sealed bag in the refrigerator for 2-5 hours. Rotate it several times so that all parts of the lamb are evenly exposed to the marinade.
Preheat oven to “rotisserie” setting (about 450ºF) for 10 minutes.
Remove lamb from bag. Rinse briefly; don't worry about getting all the spices off. Set the lamb on a plate or cutting board.
In a small bowl, combine 1 teaspoon ground ginger, 1 teaspoon ground black pepper, 1/2 teaspoon ground coriander, 1/2 teaspoon ground cardamom, and 1/4 teaspoon ground cumin. Stir spices together. Sprinkle spice blend evenly over all surfaces of the lamb.
Insert rotisserie rod through center of lamb. Fasten the rotisserie forks into the ends of the meat. Insert the rod into the oven. Place an oven rack in the lowest position with a shallow pan to catch the drippings. Set the oven to the “rotisserie” function and turn it on. Set the timer to allow 20-30 minutes per pound of meat. So for a 3 lb. leg of lamb, 60-90 minutes; for a 5-lb. leg, 100-150 minutes. (20 minutes per pound leaves the meat quite rare, 25 should leave it medium, and 30 leaves most of it well done with just a few pink spots.) Lamb should register at least 145ºF when done.
Remove from oven. Remove rotisserie forks and rod. Set the lamb on a serving platter and cover with aluminum foil. Allow lamb to rest for 5-10 minutes before carving.
Notes:
Lamb is a tender and delicate meat with a rich flavor. It benefits from rotisserie cooking, as this allows the fat to melt nicely into the meat and develop a tasty crust with the herbs.
This recipe uses many traditional Egyptian spices, and lamb is a classic feast food in Egyptian culture. The flavor is quite different from the more common Greek recipes using leafy herbs.
Ideally, the marinade should be made with all whole spices, freshly ground in a mortar and pestle. I used ground coriander because I couldn't find whole coriander seed.
If you don't have sea salt, ordinary table salt will do. The vinegar needs to be robust in order to complement the flavor of the meat; if you can't find red wine vinegar, a dark apple cider vinegar will work. Don't use plain white vinegar.
This recipe was originally published in The Wordsmith's Forge on 12/20/09, and revised for reprint 6/23/11.
Lakshmi's Mango Ice Cream

Ingredients:
2 ripe mangoes
1 cup sugar, divided
1 teaspoon vanilla extract
1 tablespoon orange-flower water
5.6 oz. can coconut milk (or about ½ cup)
1 cup half-and-half
Optional Topping: Pistachios, sweetened coconut flakes, and cardamom or fresh ginger; chop together until crumbly.
Directions:
Stand each mango on end and slice the sides of the fruit away from the huge pit. Score the fruit into squares without cutting through the rind, then evert the rind and use a knife to scrape the cubed fruit off the rind. Place mango chunks in a medium bowl and sprinkle with 1/3 cup of the sugar. Allow to macerate for 1-2 hours, stirring occasionally.
Place macerated mango chunks into blender or food processor and add remaining 2/3 cups of sugar; process thoroughly until smooth. Strain processed mango. You should wind up with about a cup of strained mango; throw away the last couple tablespoons of glop in the strainer.
Return the strained mango to the blender. Blend in vanilla extract, orange-flower water, and coconut milk. Add half-and-half then process again to combine.
Freeze in ice cream machine for 25-30 minutes.
Transfer ice cream to a lidded container and put it in the freezer to set firm.
Notes:
This recipe is optimized for fresh mango fruit. It can be made with 1 cup of canned mango puree, but the result is merely adequate instead of luxurious. This ice cream is actually worth the hassle of butchering two live, struggling mangoes. See a video on mango butchering.
Sometimes you can find the tiny 5.6 oz. can of coconut milk. A normal sized can holds about 2 cups of coconut milk.
Chaokoh is a good brand of coconut milk. So is Imperial Dragon, which is imported by JFC International – but the cans that actually say JFC Coconut Milk on the front are awful. Look for canned coconut milk in the Asian food aisle or in an international food store. This isn’t what pours out of an actual coconut, but rather a thick creamy white liquid that includes processed coconut meat.
Orange flower water is a delicate flavoring that can be found in international food stores. It brings out the floral notes and high sweet notes in the mango.
This recipe was originally published in The Wordsmith's Forge on 7/26/09, then revised for reprint 6/23/11.
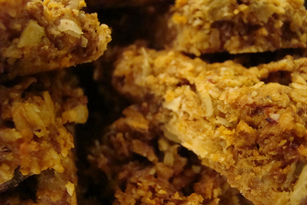
Oatmeal-Date Bars
Ingredients:
1 cup chopped dried dates
3/4 cup chopped pistachios
1 1/2 cups all-purpose flour
1 teaspoon baking soda
1/2 teaspoon ground cinnamon
1/2 teaspoon ground cardamom
1/2 teaspoon pink salt
1 cup firmly packed light brown sugar
1/3 cup white sugar
2 sticks unsalted butter, softened
3 eggs
1 teaspoon vanilla extract
3 cups rolled oats (uncooked)
Directions:
Preheat oven to 350ºF. Spray a 13x9" baking dish with cooking spray.
Chop some dried, whole pitted dates until you have 1 cup. To chop dates: First put a tiny amount of flour into a small bowl; 1/4 teaspoon flour is enough for about 1/3 cup of dates. Next, lay a whole date on your cutting board and slice it in half lengthwise. Lay each half cut-side-down and slice in half lengthwise. Gather the four strips together and chop them into short lengths. Put the bits of that date into the bowl and toss lightly in the flour. Chop a few more dates, tossing the bits lightly after each; then toss more thoroughly and pick apart any bits that are stuck together. Keep chopping dates until you've used up all the loose flour in the bowl. Transfer the floured date bits to your measuring cup. Repeat the whole process until you have chopped and floured 1 cup of date bits. Wash your hands to remove the sticky date paste. Set aside the date bits.
Chop some whole roasted pistachios. Measure out slightly more than half a cup of whole pistachios. Put them into a small spice grinder, about a tablespoon or two at a time, and grind them down to a coarse meal. You should wind up with about 3/4 cup of pistachio bits. Set aside the pistachio bits.
In a medium bowl, combine 1 1/2 cups all-purpose flour, 1 teaspoon baking soda, 1/2 teaspoon ground cinnamon, 1/2 teaspoon ground cardamom, and 1/2 teaspoon pink salt. Stir these together. Add the pistachio bits to the dry ingredients and stir again. Set aside the bowl of dry ingredients.
In a large mixing bowl, combine 1 cup firmly packed light brown sugar; 1/3 cup white sugar; and 2 sticks unsalted butter, softened. Beat until creamy.
In a small bowl, break 3 eggs. Add 1 teaspoon vanilla. Briefly mix these with a fork, then pour into the large mixing bowl. Beat thoroughly.
Gradually add the mixture of dry ingredients to the large mixing bowl, and mix well.
One cup at a time, add 3 cups rolled oats (uncooked). Mix well. Half a cup at a time, add 1 cup chopped dried dates. Mix well, making sure the dates get evenly distributed throughout the dough.
Drop blobs of dough into the corners and center of a greased 9x13" baking dish. Use the back of a spoon to press the dough into an even layer.
Bake at 350ºF for 15-20 minutes. The surface should be golden brown. Place baking dish on a cooling rack and allow to cool for 20-30 minutes. Meanwhile, set out another cooling rack and cover it with waxed paper.
Cut into bars while still slightly warm. They should be cool enough to hold together, but not so cold that they are difficult to cut through. Carefully remove the bars from the baking dish and lay them upside-down on the waxed paper on the cooling rack. This gives the bottom and sides of each bar some time to dry so they will be less sticky.
Notes:
Although inspired by a basic oatmeal-raisin bar recipe, this version is optimized for Middle Eastern flavors. The dates, pistachios, and cardamom go really well together, and the result is delightfully different from the usual American bar cookie. This recipe was a group effort, including my partner's suggestion to make dates the dried fruit, and some flavor hints from other folks.
Flouring the date bits will help keep them from sticking together. This way, they distribute more evenly throughout the dough. If you don't want to use flour, other possibilities include powdered sugar, tapioca starch, or corn starch. Also, lava soap (which contains pumice) is good for removing date paste from your hands.
If you don't want to chop your own dates, you can try buying chopped dates instead of whole pitted dates. However, I've tasted pre-chopped dates and found them tougher and blander than the tender and flavorful whole dates. YMMV.
I chopped the pistachios down to coarse meal so as to avoid big tooth-hurting chunks of nut. If you prefer your nuts in big chunks, you can buy pre-chopped pistachios or simply chop yours to the desired size.
Note that pistachios, like many nuts, often come pre-salted. If you use salted pistachios, then you should probably reduce or eliminate the extra salt called for in the recipe. However, if you're making these for summer trail food, you might enjoy the extra salt, so feel free to tinker as needed.
I used Australian pink salt. Himalayan pink salt would probably work just as well, or plain table salt if that's what you have. If you're making these as summer trail food, and you like salt, consider sprinkling a pinch or two of a flaky "finishing" salt over the top.
If you prefer drop cookies to bar cookies, you can drop this dough by heaping teaspoonfuls onto a greased baking sheet. Reduce baking time to 10-12 minutes.
This recipe requires considerable time and effort to make; it's not challenging in the sense of technical skill, but there are many steps and the dough gets stiff and stubborn. Also, I've been making this with help, and I wouldn't want to do it alone.
So you may want to designate this recipe as "festival food." But it's sooo worth it!
These oatmeal-date bars are probably high in calories, but not empty calories. They are made with natural, nutrient-rich ingredients so they have a high food value. (They would serve well as trail food if you go hiking. If you bake them a little longer, they'll hold together better.) They include a nice combination of protein, sugar, fat, carbohydrates, vitamins and minerals. They're good for dessert or snacks, and are related to such things as granola bars or food-cookies.
This recipe was originally published in The Wordsmith's Forge on 12/27/09, then revised for reprint 6/23/11.
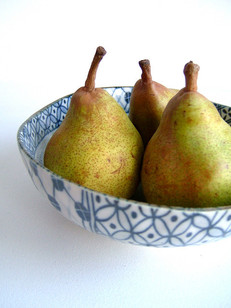
Pearberry Fillo Shells
Ingredients:
1 pear (about 1 1/2 cups chopped)
1 1/2 cups chopped strawberries
1/2 cup apple cider
1 teaspoon lemon juice
1/2 teaspoon Saigon cinnamon
1 tablespoon tapioca starch
2 teaspoons brown sugar
1/4 cup white sugar
pinch salt
30 precooked mini fillo shells
Directions:
Peel and chop the pear. Combine chopped pear and chopped strawberries in a medium bowl.
Into a saucepan, pour 1/2 cup apple cider and 1 teaspoon lemon juice. Add 1/2 teaspoon Saigon cinnamon, 1 tablespoon tapioca starch, 2 teaspoons brown sugar, 1/4 cup white sugar, and a pinch of salt. Stir in the chopped pear and chopped strawberries.
Heat to boiling. Reduce to a simmer. Cook, stirring often, until the pears start to become tender and the glaze thickens.
Remove saucepan from stove. Spoon pearberry filling into the precooked mini fillo shells.
Preheat oven to 350ºF. Bake filled shells for five minutes, until warm and toasty. Serve hot.
Notes:
Use a cooking pear, or a dessert pear that is green enough to be firm. Soft ripe pears would turn to slush in this recipe.
For the strawberries, I thawed out some that I had sliced and frozen earlier. Fresh ones should also work.
Use the best apple cider you can get, or apple juice if cider is unavailable. I happened to have some splendid cider from an orchard that specializes in it.
Tapioca starch makes a thick, glossy glaze that helps this juicy filling stick together so it doesn’t leak through the fillo shells. With the strawberries, this glaze comes out a rather bright pink, and tastes a great deal better than commercial strawberry glazes based on high-fructose corn syrup.
If the sugar sounds like too much to you, go ahead and reduce it. This is supposed to be a gooey, fruity dessert eaten in small bites but you can adapt according to your own taste.
Fillo is a thin, flaky, shapeable pastry. Most grocery stores carry some kind of precooked fillo cups that can be stuffed with filling. If you can’t find mini fillo shells, you can substitute tartlets or whatever other edible shells you have.
If you don’t want to fill the shells immediately, the filling may be refrigerated for later use. It would probably also survive being frozen and rethawed. To serve hot, the filling should probably be room temperature or warmer before going in the oven; if you leave it in the oven too long, the filling will dry out and the crust will brown. This dessert could also be served cold.
While this was cooking, it really smelled like strawberry Jello to me, even though there is no Jello (nor gelatin, nor any artificial ingredients) in it. It tastes quite a bit like strawberry Jello too, though brighter and more complex.
This fruit filling could also be used as pie filling, or as topping for cheesecake, shortcake rounds, ice cream, etc.
This recipe was originally published in The Wordsmith's Forge on 10/12/09, then revised for reprint 6/23/11.
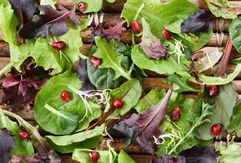
Red-and-Green Holiday Salad
Ingredients:
10 oz. package of spring mix salad greens
1 pomegranate
2 kiwis
1/2 cup diced celery
1/3 cup chopped pistachios
1 tablespoon Buddha's hand bits
Directions:
Cut open the pomegranate around the equator and gently pry it in half. Remove any loose seeds and put them in a bowl. Score the sides of each half to break it into wedges, then seed the wedges. Avoid the bitter white pith.
Cut the ends off the kiwis. Use a vegetable peeler or a paring knife to cut off the fuzzy peel. Slice the kiwis. Cut each slice into small bits.
I bought diced celery this time. If yours is whole, dice it now.
Shell the pistachios, rubbing off the papery husks as much as possible. Coarsely chop the nuts.
To assemble the salad, get a large salad bowl and arrange the ingredients in a row. Put two handfuls of spring mix into the bowl. Then add small amounts of pomegranate seeds, kiwi chunks, diced celery, chopped pistachios, and Buddha bits. Repeat the layering until you run out of greens, making the last layer with the toppings. Don't toss the salad, or all the loose bits will fall to the bottom. Top with Red Palm Oil Vinaigrette or another salad dressing.
Notes:
Spring mix can contain a wide range of baby greens. Typically most of it is red and green lettuces, some spinach, and a few other things for variety. It should have an interesting mix of colors and shapes with a relatively mild flavor. I had wanted to use a half-and-half blend of red and green lettuces but couldn't find it.
Pomegranate is a round red fruit available in autumn and winter. It opens to reveal many jewel-red seeds.
Kiwi is a small fruit with a fuzzy brown peel, usually green inside.
Buddha's hand is a type of citrus fruit with an intense floral lemony aroma. It is bright yellow with weird "fingers" sticking out from the base. It is neither juicy nor bitter, but rather crisp, tangy, and slightly sweet. Look for a firm fruit that is about the size of your two hands; the little ones aren't worth the expense. It has a short season, usually just a few weeks in late fall or early winter, so grab it when you see it. Candied Buddha's hand is bittersweet.
This recipe was originally published in The Wordsmith's Forge on 12/22/18, then reprinted here on 12/23/18.
Red Palm Oil Vinaigrette

Ingredients:
6 tablespoons red palm oil
1 tablespoon honey
1 tablespoon apple cider vinegar
1 tablespoon lemon juice
1 pinch Hawaiian red salt
1/2 teaspoon red peppercorns
dash allspice
dash apple pie spice
Directions:
Choose a container for your salad dressing. I used a .6 oz (1 7/8" wide x 4" tall) glass herb jar with a wide mouth and screw-on lid. This was perfect because the dressing filled it almost full, with just enough space left to shake with. Any similar jar should work, just make sure the lid closes securely. You can also make the salad dressing in a bowl if you want to use a whisk or mixer to blend it.
Into your chosen container, pour 6 tablespoons red palm oil, 1 tablespoon honey, 1 tablespoon apple cider vinegar, and 1 tablespoon lemon juice in that order. The oil helps the honey slide off the measuring spoon, and then the acids help clean off more of the honey.
In a mortar and pestle, grind together a pinch of Hawaiian red salt and 1/2 teaspoon red peppercorns. Add to the dressing. Add a dash of allspice and a dash of apple pie spice.
Shake thoroughly to mix. It took several minutes for me. The salad dressing should turn creamy orange to red. At this stage, taste your dressing. It should be tangy, fruity, and slightly sweet. If the flavor seems way off, this is the best time to correct that by adding the opposite component. If it's too sour or not mixing well, add more honey. If it's too sweet or too oily, add more apple cider vinegar.
Let the salad dressing sit at room temperature before you use it. Some of the ingredients may settle to the bottom if you leave it sitting for a long time, but nowhere near as fast as ordinary vinaigrette. If that happens, just shake it again. Use a spoon to drizzle it over salad greens.
Notes:
Red palm oil is made from red palm fruit. Its vivid orange to red color comes from carotenes. It has a faint nutty flavor that unites and intensifies other flavors around it. Choose organic and sustainable brands when possible, because other kinds have a heavy environmental impact.
Honey comes in many types. I used wildflower honey from a friend's family apiary. You want a medium-to-light one for this recipe. Clover or fruit blossom honeys should also work. Honey helps the other ingredients to blend, but you don't need much. I only used a ratio of 1 tablespoon honey to 2 tablespoons acid (apple cider vinegar and lemon juice) and 6 tablespoons oil, and it came out perfect.
Apple cider vinegar has a light, sweet-tart, very fruity taste. Try to find an organic live culture with the mother intact.
Red salt comes from Hawaii. It has a red to orange color and strong iron flavor that goes well with pork and some fruits. If you can't find it, substitute sea salt or plain table salt.
Red peppercorns are not true peppercorns but work similarly. They have a light, fruity taste that goes well with delicate flavors. If you can't find any, use black pepper sparingly.
This vinaigrette was designed to go with the Red-and-Green Holiday Salad.
This recipe was originally published in The Wordsmith's Forge on 12/22/18, then reprinted here on 12/23/18
Photos used under Creative Commons from 4nitsirk, Ned Raggett, Nikchick, laura padgett, norwichnuts, norwichnuts, geishaboy500
